Ultrasonic Cleaners and How to Use Them

RSS

Ultrasonic Cleaning Process Design 0

Ultrasonic cleaning works well for a wide variety of applications. Often you can simply buy the right size machine, put in the recommended amount of cleaning solution and pick a time, say 10 minutes for cleaning. Ten minutes later, voila! clean parts.

Quick and easy, but also possibly the worst way to get started with ultrasonic cleaning. Here’s why:

  • You’re wasting time
  • You’re wasting cleaning solution
  • You’re wasting power and other resources
  • Your parts are not as clean be, and may not meet spec (if you have one)
  • Even if you get good results, you don’t know exactly why, or how improve them

You can avoid all these issues simply by creating your own ultrasonic cleaning process.

Advantages of using a specific process:

  • Repeatable results
  • You can meet your cleanliness specifications every time
  • If something goes wrong, it’s a lot easier to troubleshoot
  • If you main cleaning employee is out, someone else can step in and use your process
  • Your documented process can answer questions for other parts of your organization like QC, or management

How to Create Your Own Ultrasonic Cleaning Process

Step 1: How clean is clean?

If you’re going to clean parts, your have to have an objective cleaning specification. By objective, I mean measurable by anyone with the proper equipment.

Examples:

  • Using 30x magnification on the Zeiss 450 with backlighting enabled, no particulate contamination is visible
  • When the part is examined under UV lighting, no petroleum contamination is fluorescing
  • Using our lab’s lint free wipes, a vigorous rubbing of the part produces no visible contamination on the wipe

Not an objective cleaning standard:

  • Joe in QC says it’s OK

Having a written standard provides multiple benefits:

  1. You know your work is perfect
  2. Other departments know the parts you produce will be to spec
  3. You can always show management exactly what and why you are cleaning this way

Step 2: Creating your cleaning process

This is actually the fun part. If at all possible, start with scrap parts contaminated with the same soil you need to remove. Part damage due to ultrasonics is rare, but why take the chance?

You can check here for papers related to your application:

If your application is not listed above, no worries. Start with the general procedure below.

Let’s get started. The first thing you need is a legal pad, and a pencil.

Write down everything you do.

The idea is that you’re creating a recipe for clean parts. Just like a cake recipe, yours will have ingredients, steps to take, and equipment settings.

Fill your cleaning tank(s), turn on the ultrasonics, and get them up to temperature. A good rule of thumb is to use the minimum recommended amount of cleaning solution, and set your tank to 150 f.

Clean your part for 5 minutes, then rinse and dry if needed, and apply your test for cleanliness.

Did you meet spec?

NO: Increase cleaning time, temperature, or cleaning solution percentage and try again.

*Note – only change one thing per test run. If you increase cleaning solution amount AND cleaning time, you won’t know what worked.

Keep on running tests.

YES: Great, you’re just getting started. Now that you have a baseline, it’s time to refine your process.

One at a time, start tweaking the variables you can control. The goal here is to use the least water, cleaning solution, and electric power possible while still meeting spec.

Here are the variables you have under your control and can change to improve your process:

  • Time under ultrasonics
  • Water temperature
  • Cleaning solution concentration
  • Parts position/amount in batch

Step 3: Document everything

I can’t emphasize this enough. Not only should every step of your recipe be documented, all your ingredients (cleaning solution, soil, temperature, etc.) should be as well.

Once your process is documented, print it out, put it inside a waterproof sleeve, and attach it to the cleaning system or nearby. If you later change your process, document that as well. Make sure everyone that uses the equipment knows where to find the document and has read it.

So far, so good, but exactly what are we documenting? At a minimum, the following. (Your needs will vary depending on your parts and cleaning specs)

  • Equipment startup procedures & safety checks
  • Part SKU and material of construction (steel, aluminum, etc.)
  • Soil to be removed
  • Time spent in the ultrasonic tank
  • Tank temperature
  • Cleaning solution (MSDS should be attached to your document)
  • Cleaning solution concentration
  • Time and temperature of the rinse tank, if one is used
  • Drying technique and procedure, if any
  • What happens to the parts after cleaning
  • Contact info for responsible person

The above will give you want you need from your ultrasonic cleaning system: repeatable results.

If you have any questions, you can always feel free to call me at 877-962-6847, and I’ll be happy to discuss your application, or simply fill out our contact form here.


  • Last Updated
  • Amit Jivani

Industrial Curtain Walls for Dedicated Ultrasonic Cleaning Areas 0

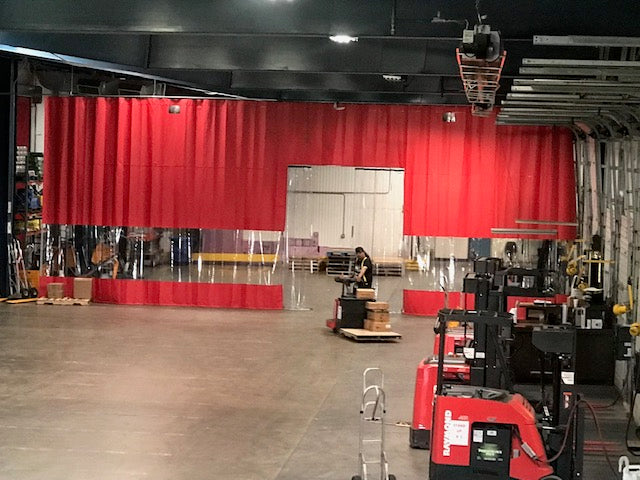
Industrial curtain walls

While most people only run into ultrasonic cleaning at their dentist's or optometrist's office, if at all, for many it's part of their daily work.

In a manufacturing environment, properly setting up an ultrasonic cleaning station becomes more difficult. Not only is there a possibility for cross-contamination and re-soiling of already cleaned parts, but large ultrasonic tanks present a noise hazard.

In many cases, a separate clean room is constructed, but this is not always possible, or even the best way to address the issue, given the modern need for flexibility and quick changeover between models and product lines.

But the requirements are still there. You need a place to keep cleaning chemicals separate from the rest of the facility, and you may need to restrict personnel access.

Add to this the concerns already expressed above, and it becomes clear that just "putting the tanks over there in the corner" will not satisfy your company's needs and may leave you open to an unwelcome visit from OSHA. 

The most economical way to solve all these issues is to set up an ultrasonic cleaning room with Warehouse Curtains. They run as little as 10% the cost of dry wall, and if the room needs to be expanded or moved, it can be easily done by your current staff. 

Deciding Which Type of Warehouse Enclosure is Needed

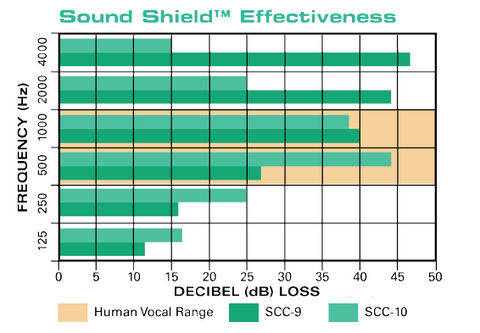
 If noise abatement is an issue, an Acoustic Enclosure with fiberglass insulation and mass loaded vinyl may be the way to prevent damage to employees hearing as well as well as OSHA audits.

chart of sound shield effectiveness

The best way to determine what type of Enclosure you will need is to do Audiometric Testing using a Sound Meter. A surge in Volume above 85 decibels and below 250 hz will require an Acoustic Sound Enclosure. The number of Industrial Ultrasonic Cleaners you are housing will determine which direction you go. 

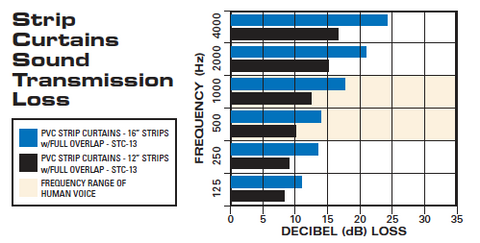
strip curtains sound transmission loss

For a more detailed look at the effectiveness of Industrial Warehouse Curtains vs Noise Control Enclosures take a look at the Steel Guard Safety Products charts on their website to determine the proper product solution.

Do you need to set up your own ultrasonic cleaning area? Follow this link for more information on our selection of industrial ultrasonic cleaners.

To get the full story on industrial curtains, visit our friends at

Steel Guard Safety Products
16520 Vincennes Avenue
South Holland, Illinois 60473
U.S. Tel: (708) 589-4588
Email: info@steelguardsafety.com


  • Last Updated
  • Amit Jivani

Ultrasonic Metal Cleaning 0

Ultrasonic Metal Cleaning

Let’s take a look at the single most common ultrasonic cleaning application there is:

Cleaning oil and particulate off of metal parts. We help customers with this in industries as varied as carburetor cleaning to military weapons cleaning.

Here's a look at a Crest ultrasonic unit cleaning motor parts. Watch how the soil just leaps off the part:


Key points:

  • If your parts are heavy, make sure you invest in a perforated tray or basket. These hold their shape better than mesh. This will make a difference in the long run, and make sure you don’t damage the bottom of your tank. A perforated tray is formed from stamped metal – usually with drainage holes between 1/4″ AND 1/8″.
  • You are going to need heat. Not just because oil and other petroleum-based soils break down better with heat, but because ultrasonics are just more efficient above 140 F.
  • If you find that you need to go to the upper end of ultrasonic compatible temperatures – say 180 f – remember that someone may need to handle the part post cleaning, so worker safety will need to be taken into consideration. 
  • Temperature can also be a huge help if you require a dry part. If you have a metal part with an appreciable mass, once you pull it out of the tank you’ll see that it dries by itself.
  • The driving issues when you set up your metal cleaning process are these:

How clean is clean? It’s important to have an objective specification for what clean means. Here’s an example of an objective specification: “Viewed under 30x magnification, no more than three particles of soil per cm2  in excess of  0..50 are visible.” Here’s one that is not acceptable: “Gus down in receiving says that it is fine.”

What happens next? If I am going to coat the part with oil and store it, that’s one thing. If it is destined for anodizing, that is quite another. Let your needs drive your process, and let your process drive your equipment selection.

Here’s a good whitepaper Branson Ultrasonics did on this some years ago…
Aqueous Degreasing of Metal Parts (.pdf 1458kb)

  • Last Updated
  • David Huckabay
  • Tags: Applications

Ultrasonic Carburetor Cleaning 0

So, you’re tired of gummed up carburetors, replacing them, or at the very least paying to have them cleaned. The problem with carburetors is that they are comparatively small and very complex.

This means to clean them properly there’s a lot of dis-assembly, cleaning, and reassembly to deal with. Not to mention the risk of breaking something during cleaning! Luckily there’s an alternative to either replacing or having your carbs cleaned professionally: ultrasonic cleaning!

  • Last Updated
  • David Huckabay
  • Tags: Applications

How Much Ultrasonic Power Do I Need? 2

Today's post will take a look at one of the most commonly asked questions in ultrasonic cleaning. We'll talk about what those power specs mean, whether or not to trust them, and more.

Dear Dave,

I an trying to choose an ultrasonic cleaner, and using the power specification to compare brands. But they don’t seem to be something I can compare apples to apples. Is there a standard I can use?

Dan

Ultrasonic Gun Cleaning with the HG575! 1

So you bit the bullet, and decided to enter the world of ultrasonic firearms cleaning and re-lubrication. Thankfully you chose the best way to get started, in that you have purchased the HG575 Gun Cleaner. But now that you have it, how on earth do you use it to both clean and re-lubricate your weapons?
  • Last Updated
  • David Huckabay
  • Tags: Applications